
A floor plan is often the difference between a job that moves and a job that stalls. Rightmove's own listing research found a floor plan is the second most important thing buyers look for after photos, and around a third of buyers are less likely to enquire about a property without one. Councils ask for plans with HMO licence applications, fire officers expect zone plans, and builders quote faster from a drawing than from a phone call. The good news: you no longer need a tape measure, graph paper, and a desktop CAD seat. This guide walks through creating an accurate, professional floor plan end to end on an iPhone or iPad - from the first measurement to a client-ready export.
What you'll need
- An iPhone or iPad. Any recent model can draw plans by hand; models with a LiDAR scanner (iPhone Pro and iPad Pro) can also scan a room automatically.
- RoomPlot - it handles capture, editing, documentation, and export in one place, so you never leave the device. There's a free tier, so you can test the full workflow on a real job before committing.
- Ten minutes per room. Less, once you've done a couple. A typical three-bed house is a 30-45 minute survey rather than a half-day with a laser and a clipboard.
Step 1 - Capture the space
There are two ways to start, and you can mix them. If your device has LiDAR, scan: point the camera and walk the perimeter, and RoomPlot uses AR + LiDAR to detect walls, doors, and windows automatically in seconds. Prefer to start from zero, or working on a non-Pro device? Draw the walls by hand - smart snapping keeps corners square and respects 45° angles, so a freehand sketch still comes out clean. Not sure which route fits your work? See our comparison of LiDAR scanning vs manual drawing.
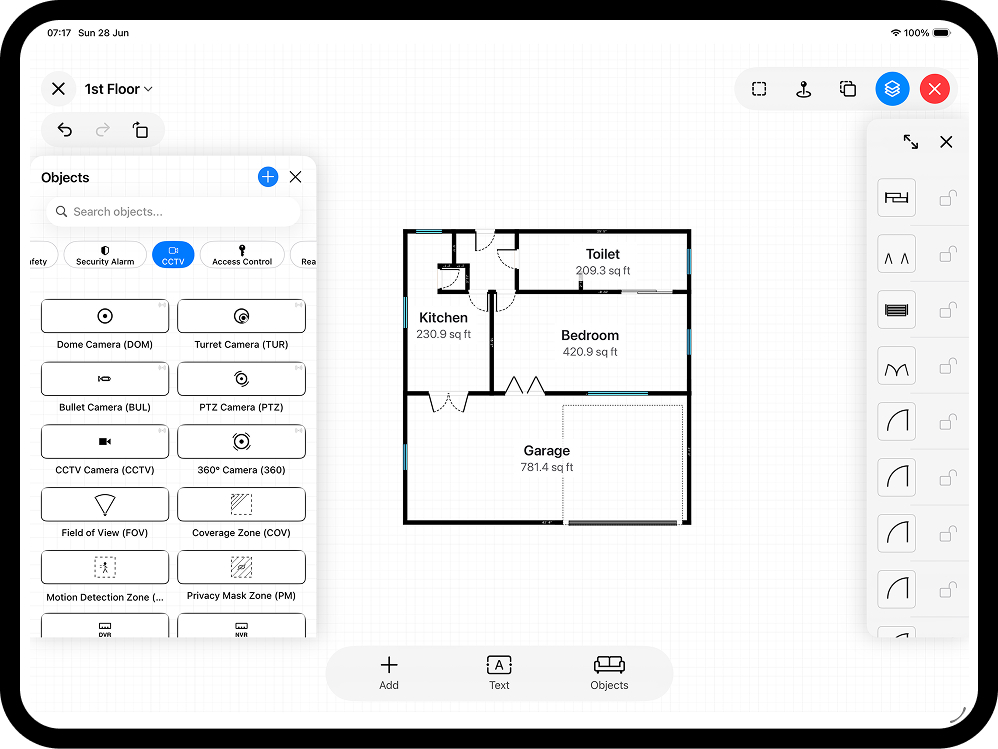
Scan first, refine by hand. The fastest workflow is to LiDAR-scan the shell, then switch to manual editing to tidy a wall or set an exact dimension. A scan turns straight into a fully editable plan - it isn't a flat picture.
Step 2 - Draw or refine the walls
Whether you scanned or sketched, this is where the plan becomes precise. In RoomPlot's editor you can move and resize any wall, set its exact length, and rotate or duplicate elements. Work in 2D for speed, or jump into 3D to grab a wall and adjust it with live measurements as you drag. Every action has undo/redo - even in 3D - so it's safe to experiment.
- Drag a wall, or type an exact length for survey-grade accuracy.
- Snapping keeps walls aligned and corners at clean angles.
- Multi-select to move or rotate a whole section at once.
- Cross-check at least two overall dimensions against a physical measurement - a laser measure or a quick tape check. If those agree, everything in between is trustworthy.
Step 3 - Add doors, windows, and openings
Drop in doors, windows, and wall openings and slide them to the right spot. Choose door types and styles, set widths, and the opening cuts into the wall cleanly. These aren't decorations - accurate openings are what make a plan readable to a builder or a fire officer. Note which way doors swing: door swing determines furniture layouts, escape routes, and whether an accessible route actually works.
Step 4 - Name rooms and calculate areas
RoomPlot detects enclosed rooms automatically and calculates each area for you - or you can set an area manually when you need exact control. Name each room, give it a colour or label, and you instantly have the room-by-room breakdown that listings and reports depend on. Switch the whole project between metric and imperial at any time and every dimension and area follows.
If the plan is going to a surveyor, valuer, or lettings desk, be clear about which area you're quoting. RICS members working on residential property measure to IPMS (International Property Measurement Standards) under RICS Property Measurement, 2nd edition - broadly, IPMS 2 corresponds to a gross internal figure, while IPMS 3C is the internal area excluding internal walls. Stating the basis on the plan ("areas measured wall-to-wall, internal") avoids disputes later. For a deeper dive, see how to calculate floor area.
Step 5 - Add symbols, furniture, and detail
A plan's job depends on its audience. RoomPlot includes furniture and object libraries - sofas, beds, kitchens, bathrooms, stairs, electrical and exterior objects - with real sizes you can move, rotate, and resize. For trades, dedicated symbol libraries let you build fire-alarm, security, and access-control zone plans with colour-coded zones, CCTV coverage cones, a "you-are-here" marker, plan titles, and your company branding. You can also attach notes, photos, and voice memos to a floor so nothing is lost between site and office. If you're producing plans for a licensed property, our HMO fire safety floor plan guide covers what enforcement officers expect to see.
Step 6 - Check scale, units, and North
Before you export, set the things that make a plan trustworthy: confirm the unit system, make sure dimensions are shown where they matter, and set a North marker once so it stamps onto every export - planning drawings and solar or CCTV surveys are far more useful with orientation shown. For multi-storey buildings, stack several floors in one project and combine them into a single view.
Step 7 - Export a client-ready deliverable
Different desks want different files, and RoomPlot ships them all from the same plan:
- PDF - print-ready pages or a full professional multi-page report with legends, area summaries, client details, and branding.
- DXF - editable CAD geometry for architects and engineers.
- USDZ - an interactive 3D scan for AR and 3D workflows.
- Image (PNG/JPG) - A4, 300 dpi, or 1080p output for listings and decks.
For portal listings, follow the portal's own guidance: Rightmove recommends uploading floor plans at around 900 × 900 pixels, one image per floor, and into the dedicated floor plan slot rather than the photo gallery - that's what enables the zoom and floor-switching viewer. A square PNG export from RoomPlot drops straight in.
Common mistakes to avoid
- Eyeballing instead of measuring. Scan or enter at least one known dimension so the whole plan scales correctly - then verify a second dimension at the far end of the plan.
- Forgetting openings. A door in the wrong place changes how a room is used - and how a fire route reads.
- Skipping room labels and areas. They're the first thing a client looks for, and the first thing a council checks on an HMO application.
- Quoting an area without a basis. "12.4 m²" means different things measured wall-to-wall versus including partitions. Say which.
- Exporting the wrong format. Send a builder or architect a DXF, a client a PDF, and a portal a square PNG - not the other way around.
Frequently asked questions
Do I need a LiDAR iPhone to make a floor plan?
No. LiDAR makes capture faster, but you can draw an accurate plan by hand on any iPhone with snapping and exact dimensions.
Can I edit a scan after capturing it?
Yes - a scan becomes a fully editable plan. Move walls, add openings, and set exact dimensions just as you would with a hand-drawn plan.
How accurate does a floor plan need to be?
It depends on the use. Marketing plans on the major portals are indicative. Plans supporting an HMO licence, a valuation, or building work need measured accuracy - verify key dimensions on site, state your measurement basis, and where rules apply (HMO room sizes, fire coverage), check the current requirements with your local authority or a competent person.
What's the best format to send a client?
A PDF - either a clean print-ready plan or a full branded report. Send DXF to CAD users and USDZ when someone needs the 3D model.
Ready to try it on your next job? Browse more floor-plan guides, or make your first plan in a few minutes.