
Quoting a CCTV job from a clipboard sketch is a gamble. Cameras don't see through walls, and the blind spot you missed on site is the one the client notices on day one. This guide shows installers how to plan camera coverage properly on an iPhone - dropping cameras onto a measured plan, watching the field of view get clipped by real walls, sizing each view against the DORI pixel-density levels in IEC EN 62676-4, and turning the result into a coverage proposal a client can sign off with confidence.
Why a plan beats a walk-round
Most coverage problems come from the same mistake: estimating what a camera sees by standing where it will go and looking around. The eye fills in gaps the lens won't. A dome in a hallway corner looks like it covers the whole corridor until a partition wall, a stairwell return, or a reception desk cuts a wedge out of the view. You only find that wedge once the kit is on the wall.
Planning on a scaled plan removes the guesswork. When the camera's field of view is drawn on top of real geometry, the walls do the cutting for you. Overlaps become obvious, so you stop paying for a camera that duplicates another. Gaps become obvious, so you stop handing the client a system with a hole in it. And because it's all on a measured plan, the channel count, the cable runs, and the price stop being guesses.
Start from the operational requirement, not the camera list
The European standard for video surveillance system design, BS EN 62676-4 (the UK edition of IEC 62676-4), asks designers to begin with an operational requirement (OR): a short statement of what each camera is for - which threat it addresses, what it must show, and at what level of detail. UK inspectorate schemes such as NSI and SSAIB audit against codes of practice built on the same structure, so writing the OR down is not paperwork for its own sake; it is what turns "put a camera there" into a defensible design.
The standard's most useful tool is the DORI ladder - four named surveillance tasks, each tied to a minimum pixel density on the target:
- Detect - 25 px/m. Enough to reliably notice that a person or vehicle is present.
- Observe - 62.5 px/m. Enough to follow what someone is doing - clothing, direction, behaviour.
- Recognise - 125 px/m. Enough to say with high certainty whether a person is someone you have seen before.
- Identify - 250 px/m. Enough to establish identity beyond reasonable doubt - the level you want on entrances and till points.
Pixel density falls with distance, so every camera has a hard limit for each task. As a worked example: a 1080p camera (1,920 horizontal pixels) with a 90° lens spreads those pixels across a scene as wide as twice the distance to it. That gives roughly 250 px/m out to about 3.8 m (identify), 125 px/m to about 7.7 m (recognise), and 25 px/m to nearly 40 m (detect). The same camera that identifies a face at a doorway only detects a figure at the far end of a yard - which is why the range you draw on the plan should reflect the task, not the spec sheet.
One camera, one task. Write the DORI task into each camera's label or note on the plan - "IDENTIFY, main entrance" or "OBSERVE, yard". When the client later asks why the car-park camera can't name a face, the OR on the plan is your answer: it was never designed to.
What makes RoomPlot's coverage different
Plenty of tools will draw a camera and a triangle for its field of view. RoomPlot does something most competitors don't: it computes the part of that field of view that is actually visible from the camera. Drop a camera on the plan and it casts a fan of rays from the lens; each ray stops at the first wall it hits. The lit area you see is the genuine wall-occluded field of view - a visibility polygon, not a flat cone.
The practical effect is that blind spots show up live. Aim a camera down a corridor and the cone runs the length of it. Swing it to face a doorway and the area behind the adjacent wall goes dark instantly, because the rays can't bend round the corner. As you nudge the camera along a wall or rotate it a few degrees, the covered area redraws in real time, so you can find the position that kills a blind spot instead of discovering it on installation day.
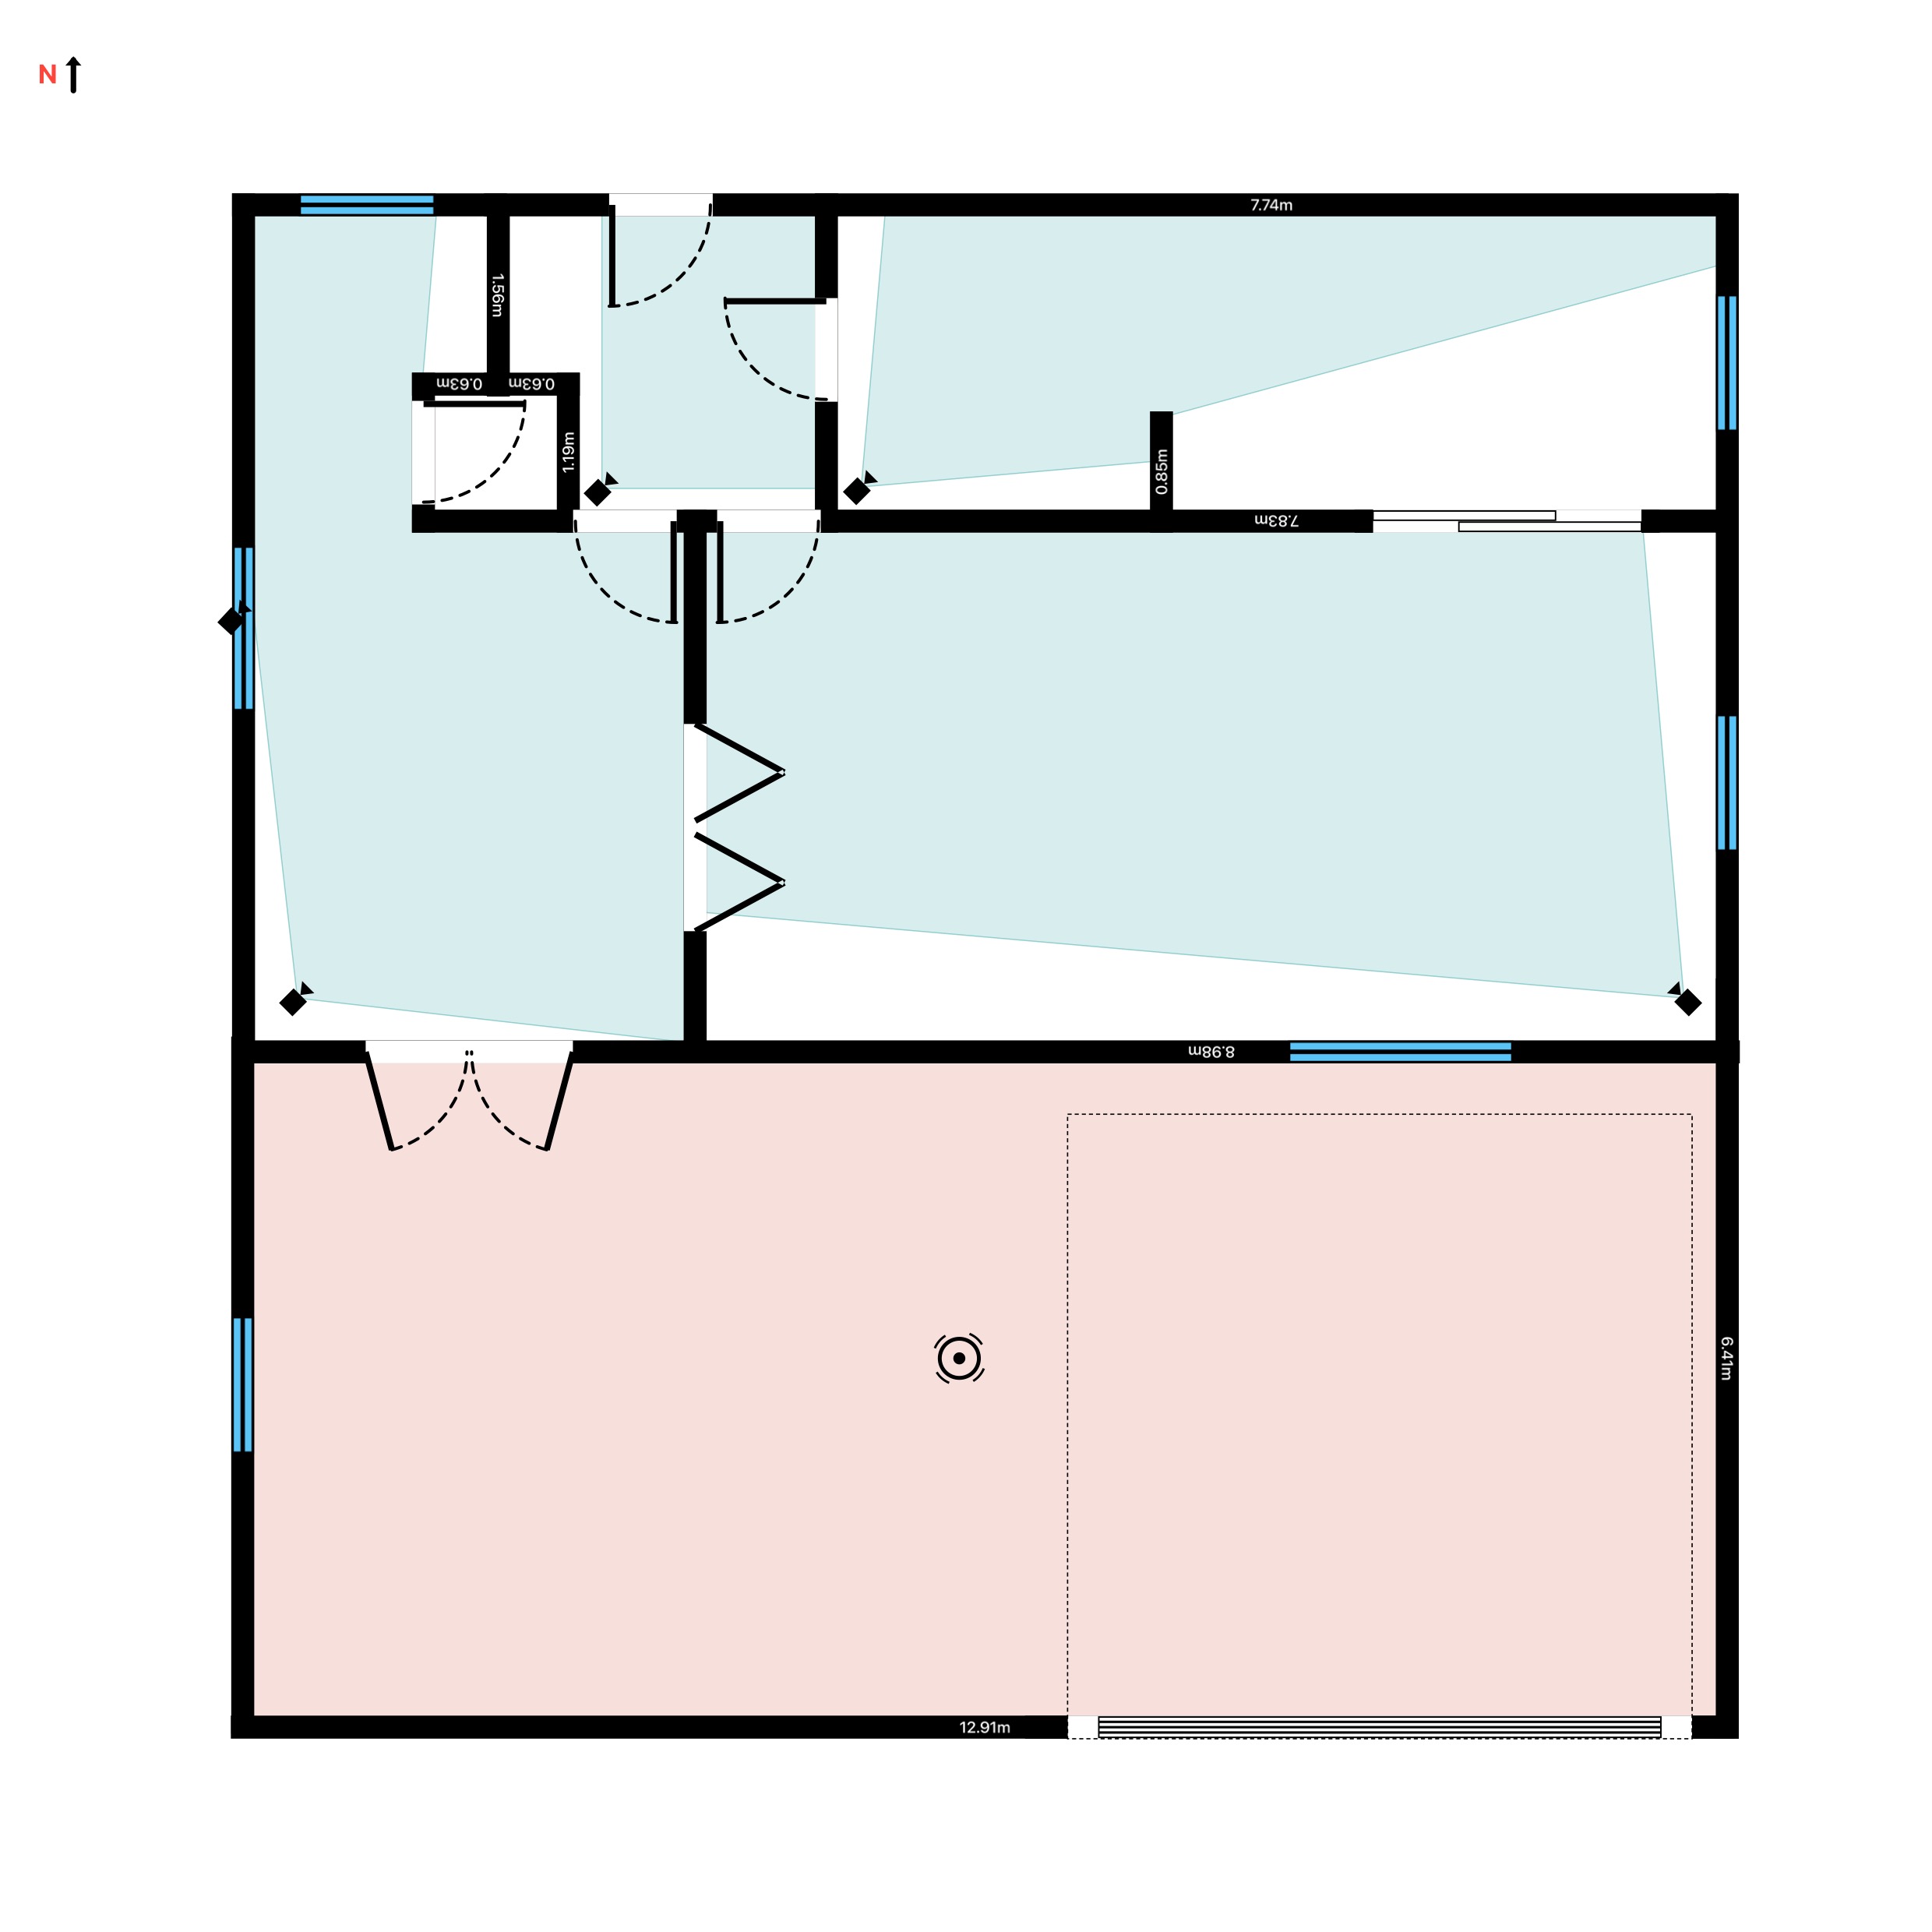
Aim, don't just place. The covered area updates as you rotate and move a camera, so treat aiming as part of the design. A 15° turn at the lens often recovers a corner that a second camera would otherwise have to cover - saving a channel, a cable run, and a line on the quote.
Set up the plan first
Coverage is only as honest as the geometry under it, so start with an accurate plan. If your iPhone or iPad has a LiDAR scanner, scan the space and RoomPlot detects the walls, doors, and windows for you. On any device you can draw the walls by hand, with snapping keeping corners square and lengths exact. Either way you finish with a measured, editable plan rather than a sketch. If you're new to this part, our guide on how to create a floor plan walks through capture to export.
- Get the walls right. The occlusion is only as good as the walls - a missing partition means a blind spot the software can't see either.
- Include the openings. Doorways and internal windows change what a camera sees through them, so place them where they really are.
- Confirm the scale. Scan or enter at least one known dimension so ranges in metres mean what they say - a plan 10% out turns an "identify" view into a "recognise" view.
- Add the North marker. On external cameras it helps you flag views that will stare into low sun at dawn or dusk.
- Work in your units. Switch the whole project between metric and imperial at any time; every range and dimension follows.
Drop cameras and tune the field of view
With the plan in place, place your devices from RoomPlot's coverage library. It carries the camera types you actually fit - dome, turret, bullet, PTZ, 360°, ANPR, thermal, and multi-sensor - and coverage is drawn automatically the moment you drop one. From there you tune two numbers that decide what the camera covers:
- FOV angle - the spread of the cone, adjustable from a narrow 10° up to a full 360°. Use a tight angle for a long corridor or an ANPR lane, a wide one for an open retail floor, and 360° for a ceiling-mounted fisheye over a lobby.
- Range - how far the cone reaches, from 1 m to 40 m. Set it to the distance at which the lens and sensor still meet the DORI level for that camera's task, not the manufacturer's maximum. Remember the trade-off: widening the FOV spreads the same pixels thinner, so the usable range for recognition or identification shrinks.
Cameras and motion sensors both produce a wall-clipped cone; fixed detectors such as smoke, heat, and intruder sensors draw a detection-radius circle instead. Each device family is colour-coded - CCTV in teal, security in blue, fire in red - so a mixed plan stays readable at a glance. The whole coverage layer renders into your exports and into a dedicated coverage report, and any device can be hidden or disabled when you want to declutter the view.
| Scenario | Typical DORI task | Suggested FOV | Suggested range |
|---|---|---|---|
| Long corridor / ANPR lane | Recognise / read plates | Narrow (10-40°) | Long (up to 40 m) |
| Reception or shop floor | Observe | Wide (70-110°) | Medium (8-15 m) |
| Ceiling fisheye over a lobby | Detect / observe | 360° | Short-medium (5-10 m) |
| Doorway / till point | Identify | Medium (50-70°) | Short (3-6 m) |
Hunt down the blind spots
Now use the live coverage to interrogate the design. Because the cone is occluded by walls, the dark areas on the plan are real blind spots - entry points, corners, and dead ends a camera can't see from where it sits. Work the plan methodically:
- Trace every entry. External doors, fire exits, and gates should each sit inside a coloured cone - ideally an "identify"-grade view, since entrances are where faces matter most. If one doesn't, move or re-aim the nearest camera before adding another.
- Watch the corners. Internal walls and returns are where coverage quietly drops out. Nudge a camera along its wall and watch the wedge behind the corner open or close.
- Check the choke points. Tills, safes, server racks, and reception desks usually warrant their own dedicated view rather than relying on a wide shot that grazes past them.
- Trim the overlap. Heavy overlap between two cameras is wasted budget. Pull a range in or widen one camera so a single device does the work cleanly - but keep deliberate overlap where one camera watches another's mounting point.
Iterating like this on the plan is far cheaper than discovering the gap with a man and a ladder on site. By the time the geometry is fully lit, you know the exact camera count and you know there are no surprises waiting at handover.
Add notes where it matters. Attach a project note, photo, or voice memo at awkward spots - a high ceiling, a glass wall, a mounting constraint - so the install team understands the intent behind a camera position, not just the dot on the plan.
Design in privacy compliance, not around it
In the UK, a business CCTV system processes personal data, so it falls under UK GDPR and the Data Protection Act 2018. The ICO's video surveillance guidance sets the expectations, and a coverage plan is the easiest place to demonstrate them:
- Justify every cone. The operator needs a lawful basis (usually legitimate interests) for each area monitored. A plan where each camera has a stated purpose is that justification, drawn.
- Keep views on the client's property. If a cone spills over a neighbour's yard, a public footpath, or a shared stairwell, either re-aim it on the plan or note where privacy masking will be applied in the VMS.
- Plan the signage. Clear signs telling people surveillance is in operation, who runs it, and why. Mark sign positions on the plan at each entrance covered by a camera.
- Retention and registration. Footage should be kept no longer than necessary - around 31 days is a widely used default - and most operators must pay the ICO's data protection fee. Large-scale or workplace monitoring may need a data protection impact assessment (DPIA) first.
Rules and thresholds change, and the operator - not the installer - carries the legal responsibility, so point clients to the ICO's current guidance rather than promising compliance on their behalf.
Turn it into a coverage proposal
Once the coverage is right, RoomPlot produces the deliverables that win and document the job. Export a branded PDF report with your company logo and the client's details, including a coverage report and legend so the proposal explains itself. The same coverage shows on the plan images and PDFs, giving the client a clear picture of exactly what each camera will see - and, just as importantly, proof that the blind spots have been considered.
- PDF report - a client-ready proposal with branding, legend, and coverage drawn in; it doubles as the design record an NSI or SSAIB auditor wants to see.
- DXF - editable CAD geometry for integrators or M&E coordination.
- Image (PNG/JPG) - crisp coverage plans at A4, 300 dpi, or 1080p for emails, decks, and method statements.
If you also fit intruder or fire systems, the same project handles PIR and dual-tech sensors and smoke/heat detectors, and there's a dedicated multi-floor fire-alarm zone-plan workflow - so a mixed proposal comes off one plan rather than three.
Frequently asked questions
Does the field of view really account for walls?
Yes. RoomPlot casts a fan of rays from the camera and stops each one at the first wall it meets, so the lit area is the genuinely visible part of the room. Aim a camera at a wall and the space behind it stays dark - that's a real blind spot, computed live.
What is DORI and do I have to use it?
DORI is the pixel-density ladder in IEC EN 62676-4: Detect (25 px/m), Observe (62.5 px/m), Recognise (125 px/m), and Identify (250 px/m). Nothing forces a small commercial job to cite it, but matching each camera's range to a DORI task is the simplest way to promise - and later prove - that a view does what the client paid for. A 2025 revision of the standard adds a finer-grained ladder for IP cameras, but the four DORI levels remain the everyday design shorthand.
Can I change the camera angle and range?
Both are editable. Set the FOV anywhere from 10° to 360° and the range from 1 m to 40 m, and the covered area redraws as you adjust. Move or rotate the camera and the coverage follows in real time.
Do I need a LiDAR iPhone for this?
No. LiDAR makes capturing the walls faster, but you can draw an accurate plan by hand on any iPhone with snapping and exact dimensions, then place cameras on top.
Can one project mix CCTV, intruder, and fire devices?
Yes. Cameras and motion sensors draw wall-occluded cones; smoke, heat, and intruder detectors draw detection-radius circles. Each family is colour-coded, and everything renders into the export and coverage report.
Ready to design a system you can stand behind? Browse more guides or build your first coverage plan in a few minutes - drop a camera, watch the walls clip the view, and quote with the blind spots already solved.